
Posts and Projects:

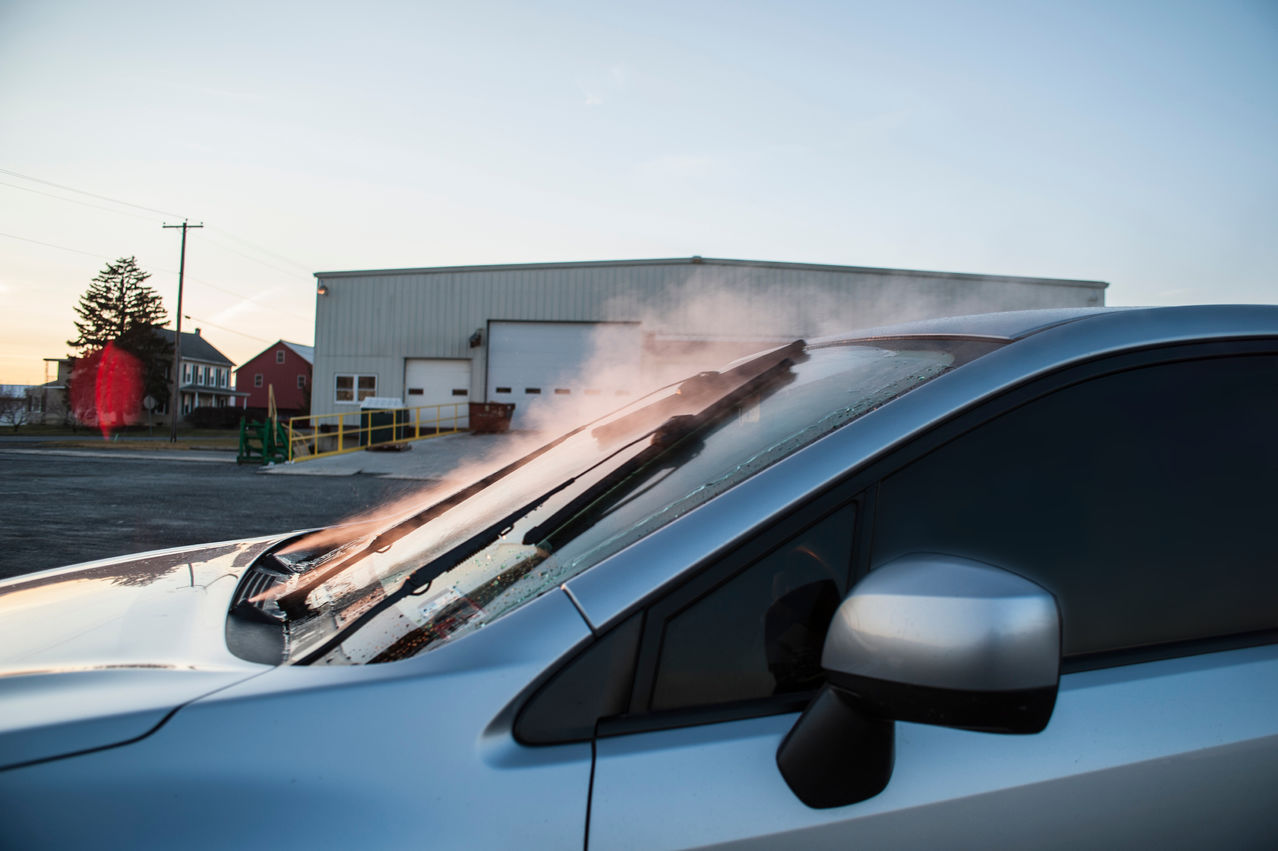
This is one of my favorite mods for any car. The idea is simple: Instead of relying on just the chemical properties of washer fluid to deice the windshield, we add some BTUs to increase its effectiveness in removing snow/ice/bug/tar/grease/etc.
In a nasty snowstorm, this could mean the difference between having to pull over to clear the windshield manually or not. Hot washer fluid keeps wiper blades pliable and quickly melts away ice that would otherwise shred them.
This has been done for years by Mercedes-Benz and Dodge, but the most (in)famous implementation belongs to GM. In the mid 2000’s, Buick advertised heated washer fluid on the Lucerne. An electric heater would warm up a small reservoir of fluid placed after the pump and this would help clean the windshield. The option made its way to other cars and trucks in the GM lineup.
Unfortunately, the heater had a tendency to burn up, sometimes taking vehicles and homes with it. A recall was issued which involved complete removal of the heater the next time the vehicle was brought in for service of any kind and owners were given a check of $100 for their trouble.
Mercedes-Benz passed engine coolant through a pipe in the main washer reservoir while Mopar offers a heat exchanger which replaces the upper radiator hose.
Having considered a number of ways to get the job done, I looked at the pros and cons to each method:
Electric heater (GM / Alphatherm)
+Fastest warm-up time on a cold engine
+Very good temperature control (Won’t boil alcohol)
-Slow recovery
-Massive electrical system load
-Lower temperature fluid than other methods
-Fire risk (GM unit only)
Upper radiator hose exchanger (Mopar)
+Good temperature control (may boil alcohol out of solution)
+Good heat transfer
+No electrical load
-Almost no heating until the engine is fully warmed up
-Expensive ($200)
Upper radiator hose copper tube wrap (DIY)
+Cheap
+Good temperature control (may boil alcohol out of solution)
+No electrical load
-Almost no heating until the engine is fully warmed up
-A lot of tubing may be required for good heat transfer and recovery time
Stacked plate exchanger (DIY)
+Good heat transfer
+Good temperature control (may boil alcohol out of solution)
+Washer temperature follows coolant temperature (no need for thermostat to open)
+Cheaper than Alphatherm and Mopar
+No electrical load
-Corrosion issues with dissimilar metals
-Requires coolant system plumbing
Having used several of these methods on other cars I’ve owned, I decided to try something different: the stacked plate exchanger. This is a compact liquid-to-liquid heat exchanger. CVT Imprezas use one to exchange heat between the transmission and engine. They’re also apparently popular in the homebrew hobby for chilling wort in a hurry.

A BMW X5 transmission cooler
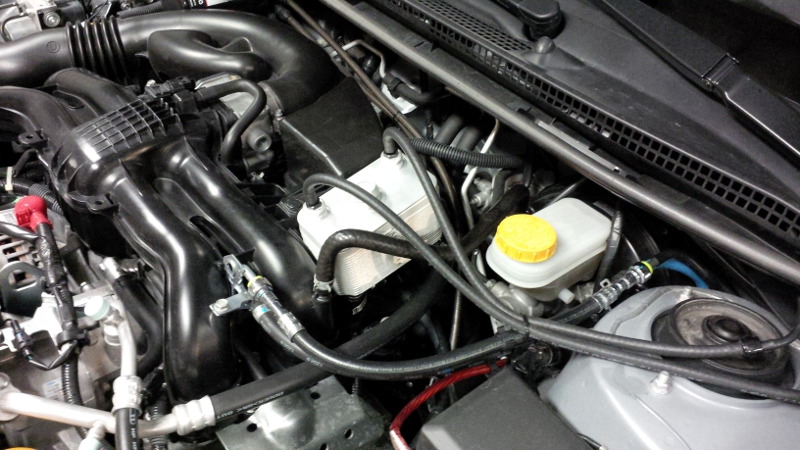
My plan was to plumb the exchanger into the heater core line before the coolant returns to the engine. Cabin heat would have first priority and any heat left over in the coolant would go to warming the washer fluid.
The exchangers available all over eBay are stainless steel, which is not a great thing to introduce into our all-aluminum cooling systems due to a phenomenon called galvanic corrosion. In short, when two dissimilar metals are joined in an electrolyte bath (engine coolant), one will corrode the other. To avoid this, I had to find an aluminum stacked plate exchanger.
The CVT warmer unit designed for our cars is a natural choice, at least for manual cars that don’t already have one, but they’re not exactly cheap. I ended up choosing a transmission cooler designed for the BMW X5 for just $45. Its metallurgy should play nicely with the rest of the cooling system.
The coolant circuit
The two pipes protruding from the unit have a diameter of about 14mm which matches the heater hose in our cars well. I chose to cut the ends off of the pipes because they taper and this would reduce the coolant flow. The hose carrying coolant from the heater core back to the engine is rerouted to the exchanger and length of universal 5/8″ heater hose carries the coolant from the exchanger back to the engine. I didn’t need to cut any of the stock hoses.
Washer fluid connections
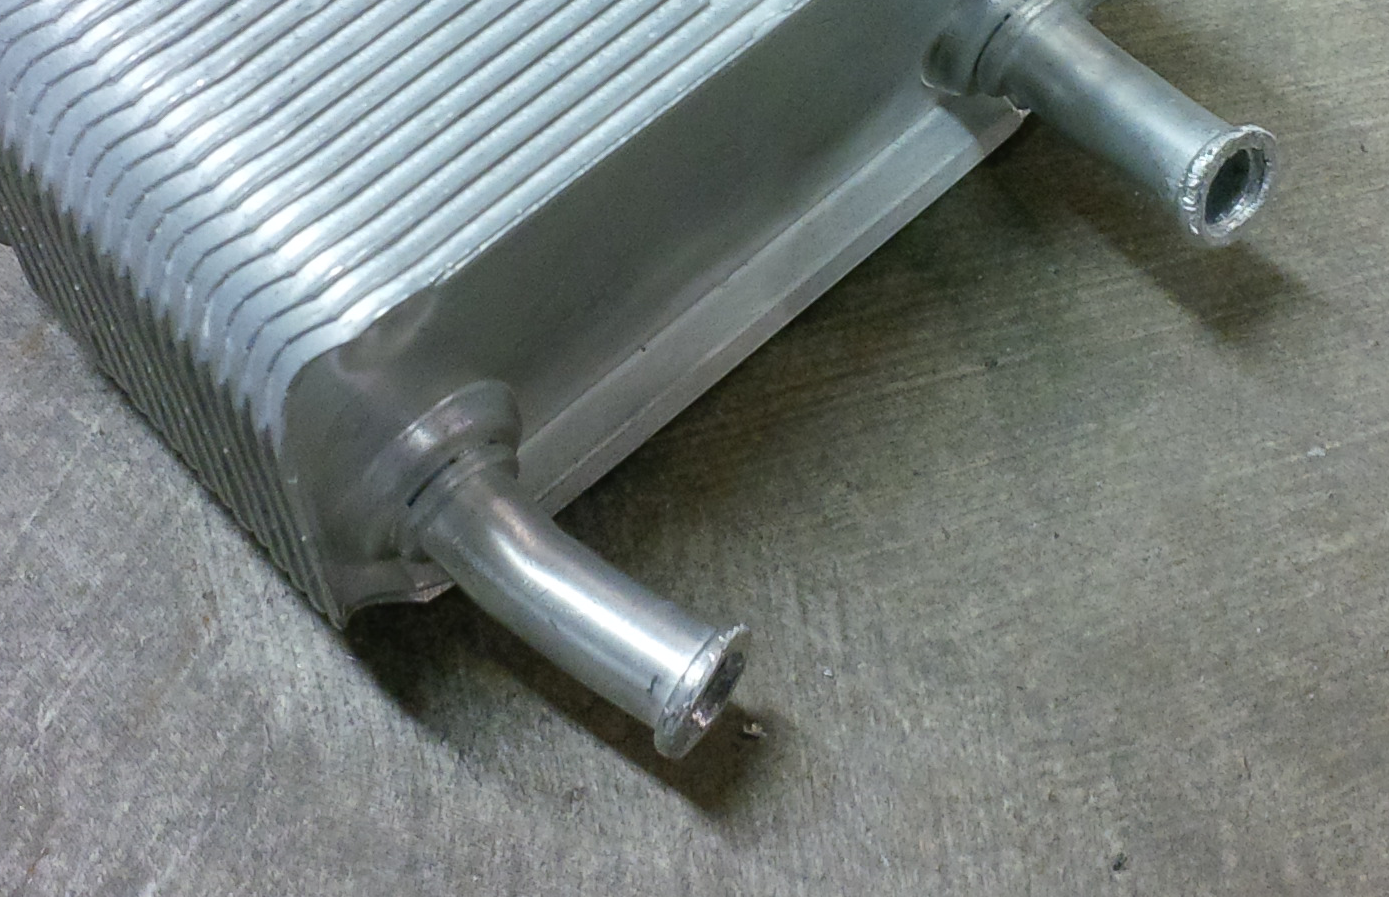
The tapered barbs are cut off for improved coolant flow.
The other circuit mates with the X5’s transmission pipes, but it also happens to be the right inner diameter to accept a 1/4 NPT tap. Once the cooler is tapped, we can use a threaded fitting to get 3/16″ hose barbs. Note these must be either aluminum or non-metal in order to avoid the galvanic corrosion issues discussed earlier. I had a tough time finding fittings to go from 1/4 NPT to 3/16″ hose in aluminum, but eventually found what I was looking for here.
I used two lengths of 3/16″ hose to intercept the washer fluid near the corner of the hood. A check valve goes on the outlet side of the heat exchanger. It keeps the fluid lines primed and prevents the exchanger from cracking in sub zero temperatures. When the engine is hot, the exchanger will be filled with a mixture of water and alcohol vapor. When the engine cools, the alcohol vapor condenses back into liquid. Without the check valve, this would cause air to be drawn back through the washer nozzles into the exchanger resulting in a water-rich solution prone to freezing. Instead, the check valve causes methanol-rich fluid from the reservoir to be drawn into the exchanger, preventing freezing and cracking.

All trademarks cited here are the property of their respective owners